Thursday, May 31, 2012

Zebra Cake

Difficulty level: Pretty easy
Time consuming: Only slightly

So over Memorial Day weekend, my friend Jamie (who came up with the name "Sweet Your Heart Out" for me) and I had a lock-in with the high school cheerleaders.  Jamie is the head coach, and I am one of her two assistants.  We thought it would be really nice to bake a cake for the girls and also double it as a birthday cake for one of the juniors.  This is the cake we made:

Making a cake is actually more of a one person job, since most kitchens (mine included) only have 1 of things, like mixers.  So Jamie and chatted while I made the cake.  She helped with the pouring of batter and taking some fantastic pictures.  

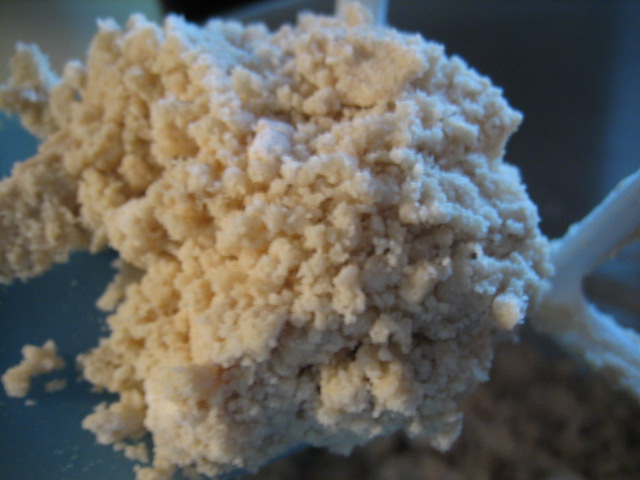
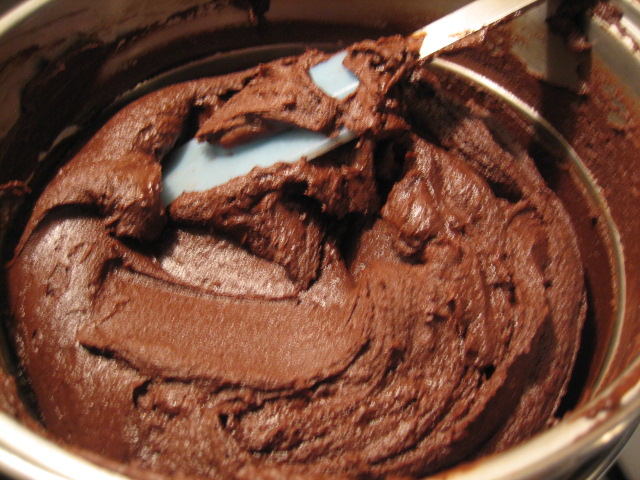
Start with 2 boxes of cake mix: a white cake and a chocolate cake.  I recommend using the same brand for the cakes*.  I used a box of Kroger White Cake Mix and a box of Betty Crocker Chocolate Fudge cake mix.  The mixes had 2 different consistencies which made "zebra-ing" the cake a little more challenging.

Mix them up according to package directions.  You will now have enough cake to make four 8" round cakes.  You only need two.  I'll show you how we dealt with that, believe me, it was far from traumatic.

Prep your two 8" round cake pans by spraying with cooking spray, placing a round of parchment in the bottom, spraying with nonstick spray again, and dusting with flour.  This is crucial to keep your cake from sticking to the pan.

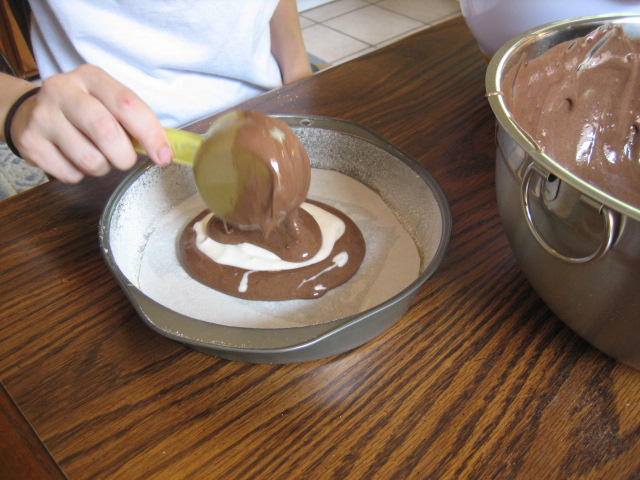
 Starting with whichever cake you'd like (I picked chocolate), place a 1/4 cup of batter in the middle of your pan (or if you're like me and lost both of your 1/4 cup measuring cups, use a 1/3 cup, it's fine.  Find the 1/4 cup measuring cups in the sink later).  Then switch cake batter and add a 1/4 cup of batter in the middle of the first.  Keep going, alternating and forming concentric circles.  Be careful to only fill 1/2 to 2/3's up the side of your pan.  3/4's is definitely too much!
 Big thanks to Jamie for taking such awesome action shots.

Repeat with the second cake.  You will have extra batter.  Make mini cupcakes (bake at 350 for 10-12 minutes), or eat it.  No judgements.
Bake the 8" cakes according to the directions (most likely 350 degrees for 30-35 minutes) or until a toothpick inserted in the center comes out clean.  Rotate your pans if you worry that your oven has hot spots.  Like mine.

If you over filled your pans, they would have taken longer to bake and come out looking like this:

It's fine.  Give them about 5 minute in the pan to cool, loosen the edges with a plastic knife (I use a "lettuce knife" that my husband constantly teases me for having), then turn upside down onto a cooling rack to completely cool.  If you leave them to cool in the pan, they will get soggy.  Once flipped onto the cooling rack, wait for them to cool then cut off the tops using a serrated knife so that they stack evenly.  Don't waste the extra, save it and add the extra frosting you will most likely have for a tasty (but sloppy looking) sample of your finished product. 

After they've cooled, stack your cakes and frost them.  I used this fantastic cream cheese frosting recipe and dyed it hot pink (I bought "rose" colored Wilton brand food gel at Michael's).


I put the frosting into a piping bag with a star tip and piped roses on top of the cake.  That's the only fancy thing I know how to do with frosting.  The cream cheese frosting was too soft to pipe roses on the sides of the cake, so I just smeared pink around the edges of the cake with an offset spatula.

 When you cut into your cake, it will look really cool, like this:
Looks like this zebra is white with black stripes.
If I had used smaller amounts of batter for each circle, there would have been more, thinner stripes.  But eh, you get what you get, and I'm still quite happy about it.

When all was said and done, the cheerleaders only ate half of the cake and were not nearly as impressed by hot pink frosting and zebra stripes in a cake.  I left the rest in the staff lounge refrigerator to hopefully be gobbled up before the end of the school year.  Teachers are better at appreciating things, anyways.

And as for the mini cupcakes I made: I brought them to a Memorial Day cookout at a friend's house where they were devoured.  My friend, Amy, made this amazingly delicious orange cake with chocolate chunks, homemade whip cream, and ganache.  I have to get the recipe from her.  There was so much good food, but I honestly wished I would've skipped on dinner just to have enough room for two pieces of her cake.

*If you use two of the same box mixes, I assume (but you know what happens when you assume things.....) you will end up with batters of similar consistency.  If you don't, then when you layer your batter in circles, the heavier batter will fall a bit more, and the lighter batter won't sink in as well to the heavier one.  My chocolate batter was more dense and my white batter was fairly thin.  This caused the chocolate batter to fall nicely into the white batter, but the white batter kind of ran over the chocolate instead of sinking in to form a pretty circle. 

*A second note: Although the cream cheese frosting tasted ah-mazing, I didn't love the flavor combination with the cake. I think either a good vanilla or chocolate buttercream would have been better but the birthday girl requested cream cheese icing.

Inspired by this zebra print cake.

Monday, May 28, 2012

Almond Joy Cookie Bars

 Difficulty level: Easy
Time consuming: No

Every month at school, the special education team gets together to go over things.  I started baking for these meetings back in the fall when one of our intervention specialists became pregnant and was always hungry, and have continued to bake for each meeting ever since.  Our special ed director said that people have never been more prompt for our meetings since I started baking.  Yay!  I will feature some of my other treats here in the future!  This month, for our last meeting of the school year, I brought these:


Doesn't it look delicious?  I had been thinking about making a coconut dessert for awhile but was unsure if people would like it.  Coconut is kind of a love hate thing, don't you think?  While waiting for an IEP meeting to start, my boss found the teachers candy stash and promptly helped himself to an Almond Joy candy bar.  The intervention specialist and myself quickly followed suite and were caught in the act by the teacher we were mooching from.  Fortunately for us, she didn't care.  But that was it, that's how I knew I could make a coconut dessert and at least 3 people sitting at that table would eat it.

The recipe is actually pretty easy.  Cream butter and brown sugar together, then add flour and salt.  

Press into a foil lined and buttered 13x9 pan, sprinkle with chopped almonds, and bake.  

While that's baking, mix coconut with sweetened condensed milk and vanilla and mix.  Spread evenly over top of crust, then bake again 'til the top layer becomes lightly browned.  

While that's going, make ganache.  I didn't have any heavy cream on hand so I used skim milk, and guess what!? It turned out just fine!  Pour your finished ganache over the coconut, garnish with chopped almonds, and set in the fridge to cool completely. 


When it's cool, use the foil to lift the bars out of the pan and cut into whatever sizes your heart desires.  I made sure to get at least 20 out of mine so that I could bring some to my meeting and share with some other teachers as well.

I think next time I would either use a larger pan (maybe a foil lined cookie sheet, although the edges might not be high enough...) or cut the coconut layer in half.  These bars were thick.  But man were they good.  My boss, who is on a diet and didn't eat the Halfway House cookies I brought to last months meeting, ate two of these.

**Sidebar.  Did you know that it's actually possible to scorch chocolate even when using a double boiler?  You can.  In fact, I did.  I was trying to melt the chocolate using a double boiler with some butter and tried to thin it out with a few tablespoons of milk.  I ended up with a seized up chocolate disaster.  I was so sad, that was two whole bags of chocolate chips, and I was not about to waste them.  I microwaved some milk until it just started to boil and poured that over my chocolate and whisked until smooth.  I learned two things: 1) that you can scorch chocolate on a double boiler if the water is hotter than a simmer (I have a stupid, old gas range that's either off or really hot, no in between); and 2) if you want to add a liquid to chocolate, you have to add a lot or else the chocolate will seize.  That's why my few tablespoons of milk were a problem.

Here's the recipe:

Crust
10T of room temperature butter (1 1/4 sticks)
3/4c packed brown sugar (I used light)
2 1/2 c flour (spooned and leveled)
1/2t salt
1/4 sliced almonds, chopped (this part isn't rocket science, use as much or as little as you want)

Coconut layer (I'd consider cutting this in half, but I haven't tried it yet myself)
28oz sweetened, condensed milk (that's 2 cans)
28oz shredded coconut (sweetened or unsweetened; that's 2 bags)
1 1/2 t vanilla extract

Ganache
 3c semisweet chocolate chips or chunks (2 bags; you really could use whatever chocolate you prefer)
1/2-3/4c skim milk (but heavy cream is better)
2T butter

Garnish (optional)
A few tablespoons of sliced almonds, chopped.

Ready, set, go!

1) Preheat your oven to 350 degrees.  Line a 13x9 baking dish with foil, leaving some hang over the sides so you can lift your bars out of the pan when you're done. Coat your pan with something nonstick, like spray, or butter, or shortening....etc.

2) In the bowl of your stand mixer or with an electric mixer, cream butter and brown sugar.  Since I have a stand mixer, I used this time to sift together my flour and salt.  **Don't sift before you measure, or you might end up with a significantly different volume of flour than what I used which would alter the results.  Slowly add flour mixture to butter.  Mix until it has a chunky lumps, like peas.

3) Press the dough evenly into your pan.  Sprinkle your almonds on and lightly press so they stick into the dough.  Bake for 8 minutes.

4) While the cookie layer is baking, in a large bowl combine your sweetened condensed milk, coconut, and vanilla, and mix until the coconut seems evenly coated.

5) When your cookie layer has baked and cooled slightly (or not, if you're impatient like me), spread the coconut mixture evenly over top.  Bake for 20-25 minutes, until the top has started to brown.  (I only baked for 20 minutes but probably should've gone a little bit longer).  If you're worried about uneven baking, rotate your pan halfway through baking.

6) While the coconut layer is baking, make your ganache.  Combine butter and milk in a medium saucepan and heat on the stove until it just starts to boil.  Immediately remove from the stove and pour in your 2 bags of chocolate chips.  Let it just sit and hang out together for a minute or so, then whisk until the chocolate is smooth.

7)  When your coconut layer has finished baking, pour the ganache on and spread evenly with a spatula.  Garnish with almonds.  You can let this sit at room temperature or stick it in the fridge to set the ganache.

8) When everything is cooled and set, remove the bars with your foil handles and cut into whatever size your heart desires.

9) Enjoy.  Maybe with a glass of milk because these are pretty rich.


This recipe is adapted from Just A Pinch

Thursday, May 24, 2012

Homemade Vanilla Extract


Difficulty level: Very easy
Time consuming: Not actively, but there's a lot of wait time for the finished product.
Cost: Around $20
Benefit: 4 cups (32 fluid ounces) of PURE vanilla extract.

Materials: vanilla beans, paring knife &cutting board, vodka, container (if you're not gonna use the vodka container).

Vanilla extract I gifted a friend in a wedding basket.
Split vanilla bean.


Have you ever read the ingredients on a bottle of vanilla extract?  A bottle of McCormick pure vanilla extract is made from "vanilla bean extractives in water and alcohol."  Spice Select brand lists their ingredients as "water, alcohol, extractives of vanilla bean."  And if you'd like to go with a nicer, pricier supermarket brand, Rodelle Gourmet Pure Vanilla Extract contains "Vanilla bean extractives in water, alcohol, and sugar." Don't even get me started on the imitation stuff (it's synthetically processed from other plants and combined with water and alcohol)

And not to mention how expensive it is for even a small bottle - around $3-5 for a 2 oz bottle.  An 8 oz bottle at a gourmet grocery store near me sells for $18!

Making vanilla extract is possibly one of the easiest things you can do to personalize your baking.  People are always shocked when I say something is made with homemade vanilla.

The FDA regulates commercial vanilla extract to contain 13.35 ounces (in weight) of vanilla bean to 1 gallon (128 fluid ounces) of alcohol (35-40%).  If you were to replicate the exact amounts to make vanilla extract at home, that comes out to about 1 ounce of vanilla beans to almost 10 fluid ounces of alcohol (for a better grasp on how much liquid that is, remember that 1 cup of liquid is equal to 8 fluid ounces).  When I make my vanilla at home, I use a larger ratio of beans to liquid since I don't have machines or anything to help me extract flavors.

So let's get to it.

Start with 1 ounce of vanilla beans (approximately 8-12 beans; when I weighed mine out for this, it came to 11 beans per ounce). I buy mine on Amazon from a supplier called Vanilla Products USA (free shipping! But not if you buy direct from Vanilla Products USA).  I get the Madagascar Bourbon Grade B Extract Vanilla Beans (6"). (The last time I purchased beans, a friend and I split half of a pound [8oz] which in total cost $20.  We ended up with over 40 beans EACH for just around $10). Grade B refers to the appearance and moisture content of the bean.  Grade B is drier than Grade A (meaning that by weight, purchasing grade B gets you more bean and less moisture, which is fine since we're about to soak it in vodka).  Grade B is also not as pretty, the skin might be torn or broken.  Again this is fine, we're about to cut it open anyways.

Find yourself a nice container.  Preferably one bigger than 1 cup.  I found that 6 beans can displace about 2 oz of liquid.  Steralize if you'd like by following water bath canning methods.  I do this, but I don't think it's vital to the success of your vanilla.

For this batch, my husband picked me up Kroger's finest bottle of Popov (40%) measuring 1 liter.  1 liter is equal to 33.81 fluid ounces.  Don't believe me? Here, look.

Sorry this is sideways.  I can't figure out how to fix it in Blogger :(

So I poured my vodka into a Pyrex measuring cup so that I could slowly add beans and vodka and not worry about the whole bean/liquid displacement issue.  If one liter is just over 33 ounces, I should be able to just use my 4 cup measuring cup, right? Wrong.  Someone needs to tell Popov they are under promising and over delivering on the amount of product they sell.

That's definitely 36 ounces.

Rejoice over the almost 3 ounces of extra booze.  Then continue.

Grab your bean at one knobby end, and insert the tip of a paring knife 1/4-1/2" below the knot and slice completely through the bean all the way to the end.  Then drop the bean into your container and proceed with the rest of your beans.  You'll end up with some vanilla seeds (aka caviar) on your hands and it will smell delicious.
Here's what I'm calling the knobby, hooked, end.
Stab,
split, 
drop;
repeat!

Pour over top of your beans 1 cup of basic vodka that's 35%-40% alcohol.  I tend to buy whatever is cheap (only the finest Korski or Popov for this girl!)


Ta-da! What it looks like on day 1.
When all was said and done, I used 4 ounces of beans (45 beans) and 4 cups of vodka.

And that's it.  Now you have to wait.  Cap your container and put it in a dry, dark place, like inside of a cabinet or pantry.  Shake once a week or so for 2.  Whole.  Months.  That's right, 8 weeks.  Some other sources will tell you 1 month.  My mother would tell you 3.  I go with two, because that's about as long as I can wait before I want to use it and still feel like I haven't cheated.  As my extract ages, I will take pictures and update.

Since I used a large liquor bottle, this batch was relegated to the floor of my pantry with the (probably) skunked Hudy Delight and my broom.


*Updated on 6/21/12.
The vanilla will start to impart it's flavor almost immediately.  And you will see your vodka become darker in just a matter of days.  If you have no self control, like me, you'll probably open your bottle at least once a week to smell how yummy it is.

Did you wait two months? Good.  Strain your vanilla through a wire sieve lined with a coffee filter into a glass measuring cup (or any container, really.  I just like that because it has a spout for pouring).  Mmmm, doesn't it smell great?  I funnel mine into an old vanilla extract bottle I saved.  Or just store it in a jar or other container. 

All that great vanilla flavor, sans added water or sugar!

But wait!! Don't discard your vanilla beans and solids, put them back into your container, add vodka, and wait another 2 months for a whole new batch of vanilla extract.  This can go on for years.  Saving you money for sure in the long run, especially if you bake a lot, like me.  It also makes a great gift.

Bottom line: For 32 ounces of pure vanilla extract, you would've spent between $48-$80, depending on the quality and brand you buy at the store.  Take away the initial $20 dollar investment and you've saved $28-$60 on what can probably be a lifetime supply of vanilla extract for most people.  And if you do use it all, then refill and keep going, the savings just get bigger and bigger!

**6/21/12 update: I stopped taking pictures of my extract after each week because after it got dark, like it did after the first week, you couldn't really see a difference.  But with one twist of the cap, you could smell how aromatic the extract has become.
**7/21/12 Updated to include links to vanilla bean suppliers.
**12/19/12: If I can, I try to let the vodka and beans mingle together for about 6 months (if I'm patient enough), strain the extract from the beans, and put the "spent" beans in a mason jar to save for other applications.  I no longer add vodka to "top off" my extract, nor do I reuse beans to make more.  I do put used beans in a container of white sugar (2 beans to 500grams of sugar) to make vanilla sugar.  I have also scraped the caviar out of the used beans and saved it in a container for other uses (like sugar cookies, frosting, etc).

Wednesday, May 23, 2012

Welcome!

Welcome! My name is Erica and I love to bake.  I bake for my family, friends, and coworkers.  Pretty much anyone willing to be a guinea pig for the recipes I stumble upon from various blogs or Pinterest.  I am 25 years old and I work as a speech-language pathologist in a small, urban school.  

This summer will be my first summer sans work or school since I was 16.  I am so excited!  My husband Kenny and I bought rec pool passes and amusement park passes for the summer.  He's a teacher so he's off for the summer, too!  With all the free time I anticipate having, I thought it might be fun to try my hand at blogging and post for others my realistic attempts at baking and photography.  Have you heard of Bakerella (www.bakerella.com)? She's awesome.  Everything she makes is gorgeous and her photography skills are phenom.  Mine are not, but I'd like to think that I achieve what the majority of the population would create in their homes.  So hopefully that makes me relatable.  I hope you enjoy the recipes I post (I will always give credit to original authors), the stories I might share, and the pictures I attempt to make look artsy using a 7 year old Canon PowerShot.  My first post will be on homemade vanilla extract.  Following that I plan to share the Almond Joy Cookie Bars I shared today in my Special Education Team meeting.